


Hi, this is my first article here, Welcome to my Tech talk.
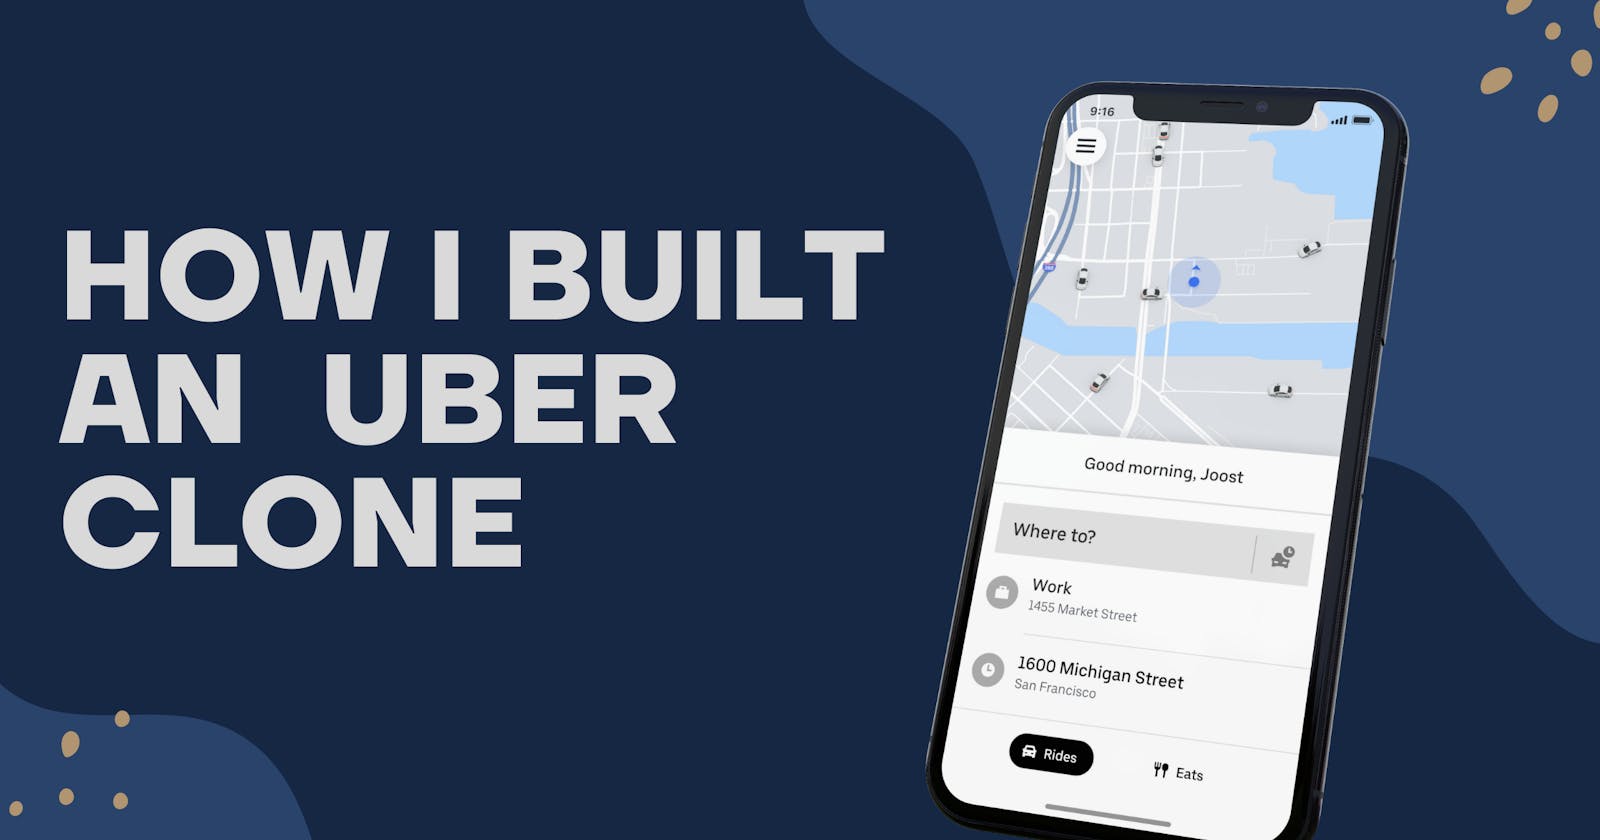
While trying to order a ride from my uber mobile app some time ago, I navigated through the pages and wondered how the passenger’s interface flow was developed and put in place. I saw this as a challenge and decided to give it a try by making a web-version clone of it. Luckily for me, while doing my research, I stumbled upon the web-app version (which I never knew was in existence) and then decided to make a replica.
In this article, I’ll be working you through how I made a clone of the Uber web app passenger interface using ReactJS and Typescript.
Please note: This is not a tutorial or a code explanation therefore, there will be no detailed code snippet in this article.
I’ll start by listing out the technologies (Languages, frameworks, and API) used during the build process.
ReactJS with Redux toolkit.
Typescript.
Tailwind.
Tailwind CSS and styles component.
IP Geolocation API.
Google map API.
Firebase API for authentication.
React with Redux toolkit.
Due to my experience with ReactJS and some of the flexibility it has, I decided to stick with it in putting up this project. On the other hand, the Redux toolkit has been my favorite tool to use while managing global states as it is highly maintainable, provides ease for testing, and is valuable in server-side rendering.
All global states like the user’s initial position value and coordinates, the pickup value and coordinates, and the destination value are being managed using the Redux toolkit.
Typescript.
With this, I was able to specify the data types used across each component and spot bugs early.
Tailwind CSS and style component.
Having heard talks about Tailwind CSS and its high customization features, I decided to give it a try. Aside from its high customization features, I built complex responsive layouts and wrote common utility patterns faster while working on this project. Moreover, styled-components allowed me to style my custom components and prevented bugs from my class names.
Even though this project was the first project I implemented them with, I was still able to have easy maintainability on my code-base style.
IP Geolocation API.
With IP Geolocation, you can get details of a particular user like the continent name, county name, city, country code, currency, and so on based on the user’s IP address. My purpose for using this API on this project was to access the user’s current country code. This country code was used alongside the user’s input query data while trying to get the place auto-complete result on the search. I’ll discuss more on that later in this article.
Google map API.
All Dynamic maps, Direction-routes, Place auto-complete, Distance-matrix, and Driver’s current location were implemented by the Google map API. Try and follow the article till the end to find out more details about this.
Firebase API for authentication.
I decided to make things simple by using the federated identity provider integration for Firebase. Users can sign in with their Facebook or Google accounts to access the app.
THE KEY FEATURES AND THEIR IMPLEMENTATION.
The map layout.
If you’re familiar with using Google Maps as a developer, you’ll notice that the default map layout differs from that of the Uber web app. I was able to achieve this using the " Style Reference for Maps " to mimic that of Uber. With the style option from Google Maps Docs, you can easily customize the presentation of the standard Google map styles, changing the visual display of features like roads, parks, businesses, and other points of interest.
I used a JSON style declaration to change the color of the Administrative fill geometry, the Landscape filled geometry, and the poi fill geometry. Beyond that, I was able to set the road visibility on, hide the landscape's natural terrain, remove all intensity from the color of poi, and so on, as seen in the code base here.
Check the code snippet below to have an idea of how this was done.
[
  {
    "featureType": "all",
    "stylers": [
      { "color": "#C0C0C0" }
    ]
  },{
    "featureType": "road.arterial",
    "elementType": "geometry",
    "stylers": [
      { "color": "#CCFFFF" }
    ]
  },{
    "featureType": "landscape",
    "elementType": "labels",
    "stylers": [
      { "visibility": "off" }
    ]
  }
]
You can declare a variable to the array and set it as the style in your map option.
Places auto-complete.
The auto-complete feature of the Google Maps Platform gives a type-ahead search behavior of the Google Maps search field.
The Place Auto-complete JavaScript library has been the usual way to implement the auto-complete feature while working on a web app. However, using this already-made library has some limitations.
I considered using the Place auto-complete web service approach which I think will be most suitable to achieve my goal. Because of that, I can customize the style of the result displayed as opposed to using the Place autocomplete JavaScript library.
The Places auto-complete service returns place predictions in response to a HTTP request. The request specifies a textual search string and optional geographic bounds. This service can be used to provide autocomplete functionality for text-based geographic searches by returning places such as businesses, addresses, and points of interest as user types.
The parameters I used to perform this simple action are the input which is the text string on which to search, a country that will restrict the search result to places within the user's country, and of course a unique API key.
The code snippet below gives a clear picture of how this was done.
const getPredictions = (input:string) => {
   axios(`https://maps.googleapis.com/maps/api/place/autocomplete/json?input=${input}&components=country:${countryCode !==null?countryCode:'NG' }&key=${GOOGLE_API_KEY}`, {
      method: "GET",
      headers: {
        "Content-Type": "application/json"
      }
    })
    .then( async res => {
      try {
        const response = await res.data;
        const result = response.predictions;
         return result;
      }catch (error) {
        console.log(error);
      }})
  }
The code above returns an array of objects as the predicted result.
Country code.
Having a dynamic country code was not what I initially thought would be needed, but then, I had a second thoughts.
Following my opinion on how Uber was built, the country code used to get the predicted result will definitely be based on the user’s location. Having thought of that, I decided to look for a way I could get the user’s country code just immediately after the search input Is being mounted, after making some research, I came across IP Geolocation which provides a real-time and accurate Geo-location response.
Following this end-point https://api.ipgeolocation.io/ipgeo and using the approach below,
const getCountryCode = (IP_KEY) = > {
 fetch(`https://api.ipgeolocation.io/ipgeo?apiKey=${IP_KEY}`)
    .then( async res => {
      try {
        const result = await res.json();
       return result;
      }catch (error) {
        console.log(error);
      }
    })
}
a JSON object response of IP, host-name, city, country_code, and so on is being returned as seen below.
{
  "ip": "8.8.8.8",
  "hostname": "dns.google",
  "city": "Lagos",
  "country_code2": "NG",

  …...others
}
The country_code2 which is the user’s country code is now set as the country parameter of the place auto-complete endpoint.
User current Geo-location.
In late 2016, uber made an update to give the app permission to track location data at all times, which they say will improve Pickup and Drop-off accuracy. Implementing this feature was a bit straightforward, as I’m quite familiar with using the getCurrentPosition method. With the getCurrentPosition, I was able to get the current location of the particular user’s device in terms of their coordinate(latitude and longitude).
 if(navigator.geolocation){
   navigator.geolocation.getCurrentPosition(
    (position: GeolocationPosition) => {
     const { latitude, longitude } = position.coords;
      console.log(latitude, longitude);
    }
  )
 }
The snippet above logs the current latitude and longitude of a particular user’s device location.
It is quite obvious that this form of data will be best for the user’s experience if displayed in an address format. With Reverse Geocoding, I was able to achieve this.
Storing the pickup and destination location data.
Looking closely at the Uber web app, all the Pickup and destination location details(address name, coordinates, and place ID) were stored as a URL parameter. Following this approach was quite helpful in the sense that, I still maintain my location input and info-window state whenever a refresh is being made.
Direction API.
The Directional API is a service that uses a HTTP request to return the most efficient routes. For easy creation of the direction renderer, I used the Direction API library for JavaScript.
With that, I was able to create an instance of the direction service and route the direction, passing an object consisting of origin, destination, travel mode, and driving options as an argument. To see how I did this, check the snippet from the project's codebase HERE
Distance matrix
The travel duration and the drop-off time were calculated using the [distance matrix API] ( developers.google.com/maps/documentation/di.. ). This API returns information based on the recommendation route between the starting and the ending point.
const getDistance =  (origin, end) => {
axios(`https://maps.googleapis.com/maps/api/distancematrix/json?origins=${origin}&destinations=${end}&units=imperial&key=${GOOGLE_API_KEY}`, {
      method: "GET",
      headers: {
        "Content-Type": "application/json"
      }
    })
    .then(async res => {
      try {
        const response = await res;
        const {data} = await response;
        const result = data.rows[0].elements[0];
        return result;
      }
      catch (error:any)  {
          console.log(error);
      }
    });
}
From the snippet above, the function returns the duration which is an object with the text and value as the key. The text was used to calculate the duration and drop-off time of the journey. The value on the other hand was used to calculate the prices for each journey.
Under normal conditions, the duration and the price of the journey can be gotten directly from the uber estimate-time and uber estimate-price API endpoints respectively. However, there are a lot of restrictions on that at the time of development.
Conclusion.
Thanks for following up till the end, a lot has been said already. However, every detail of the development process cannot be stated. You can always refer to the codebase on GitHub HERE for more details.
This is just a brief walkthrough on how I built my version of the uber-clone, I welcome any form of criticism as well as corrections. Thank you.